Implementing a simple Web UI Adaptor of RentIT’s Catalogue Search
The purpose of this lab session is twofold: * To learn how to develop a Web UI adaptor on top of a domain model using Spring Boot * To learn how to write tests of Web UIs using Cucumber
We will start by writing the Cucumber tests.
User story
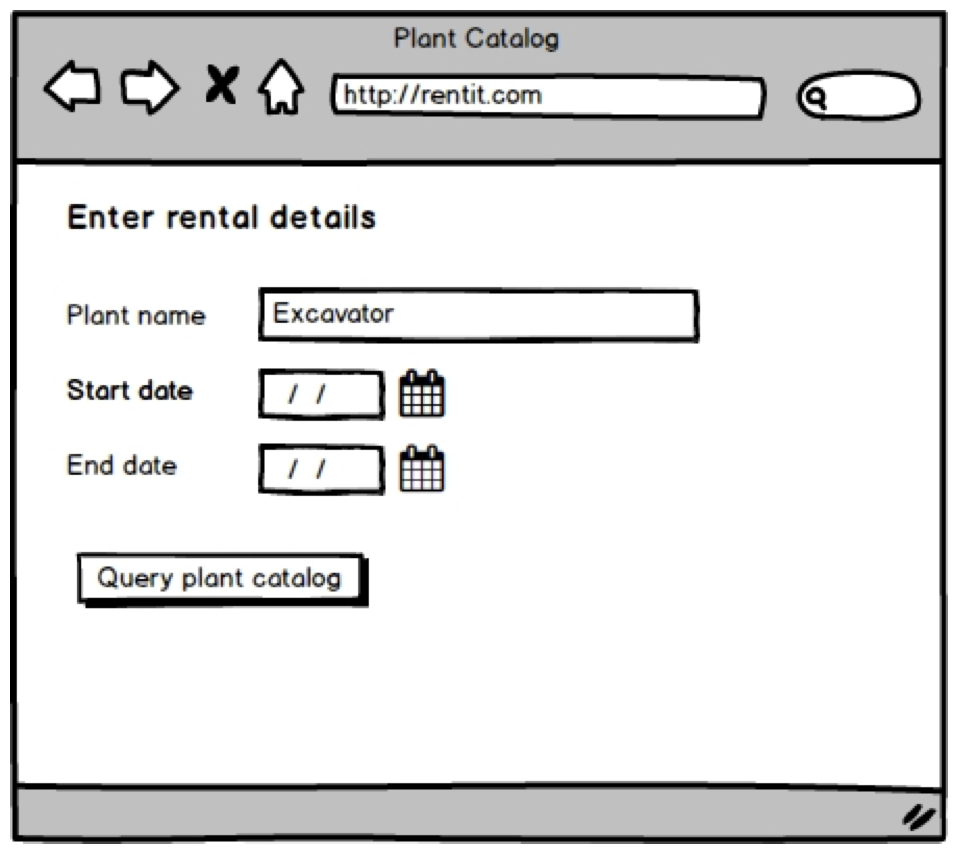
To illustrate the requirements to be implemented in this practical, we will use a sequence of wireframes. First, the user can query the system to retrieve the list of plants that are available for a given rental period. To this end, the user enters (a substring of) the name of the plant to be hired and the start and end dates for the rental. The corresponding form should look like the first wireframe (from left to right).
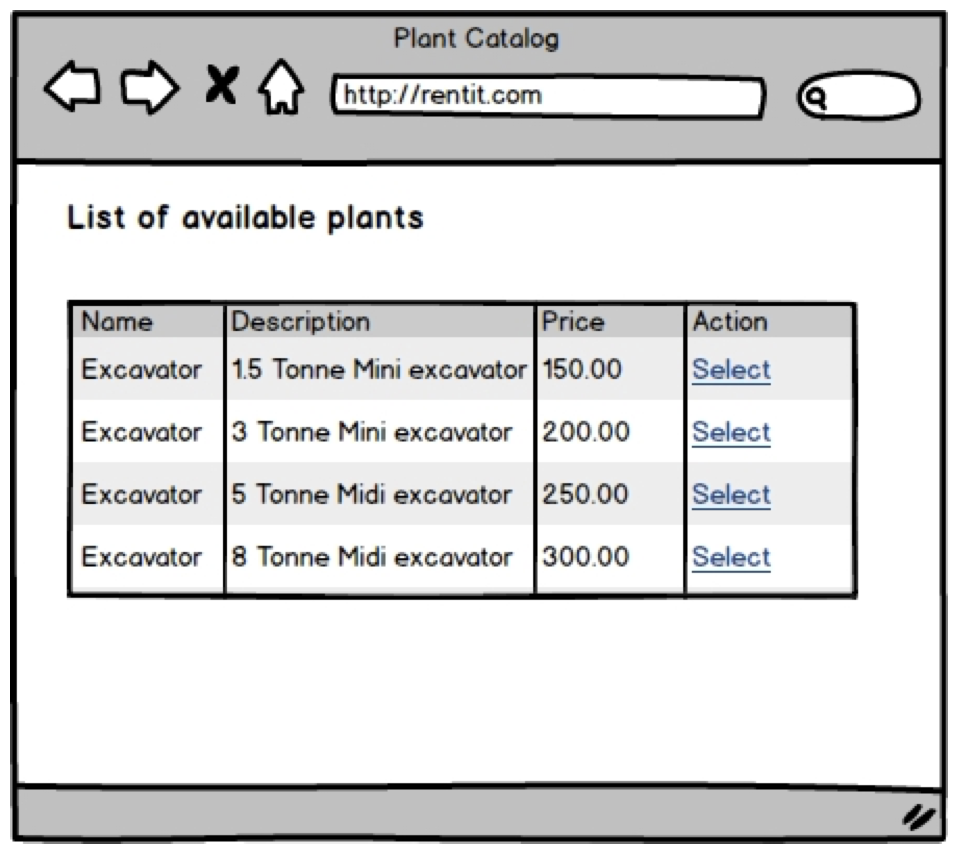
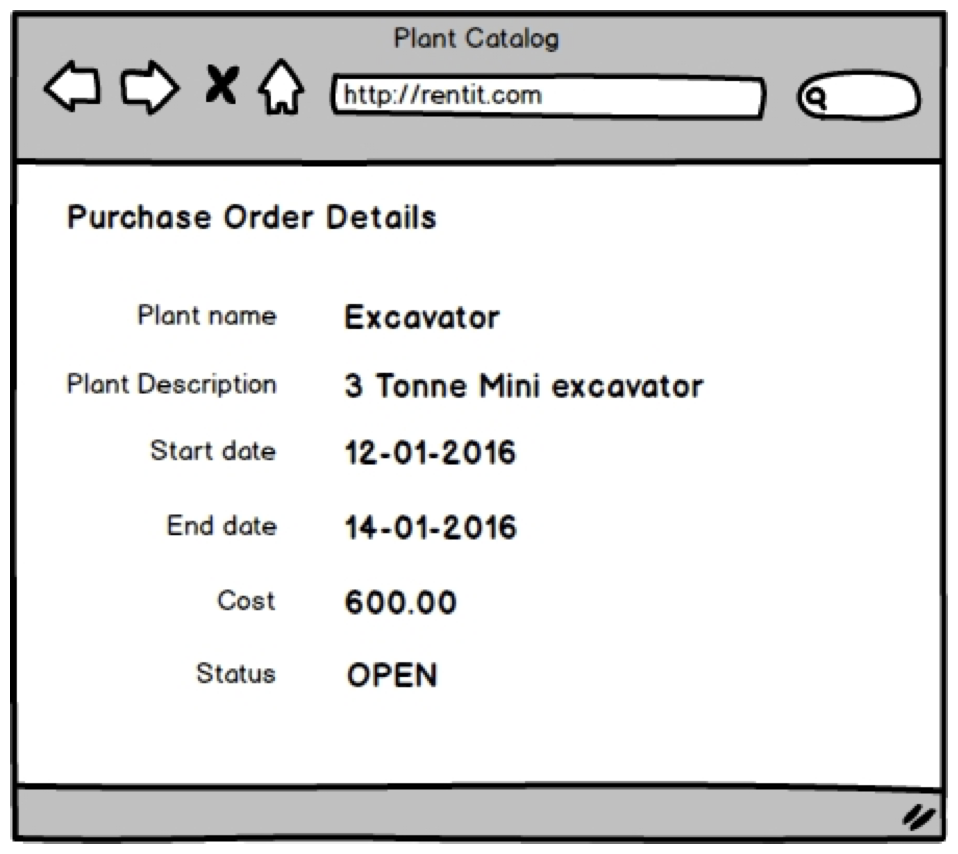
When the user clicks the “Query plant catalog” button, the system retrieves from the underlying database, the list of plants matching the requirements. Of course, the result of the query must include only "serviceable" plants, that are not engaged for rental with another customer or programed for a maintenance in requested period. An example of the result of the catalog query is shown in the second wireframe. Then the customer selects the plant that fits better her/his requirements from the list by clicking the corresponding link. For the sake of simplicity, we will assume that a purchase order is created for a single plant. Finally, the purchase order will be created immediately after selecting one row (link “Select”) from the list of available plants. Then, the system must present the details of the newly created purchase order, as shown in the last wireframe (please also include the status of the purchase order).
Cucumber
Cucumber is a tool for acceptance testing that incarnates the approach to Behavior-driven development. The tool provides bindings with multiple programming languages and, hence, we will use to steer the implementation of our Web tier in Rentit’s information system.
The following user story, written in Gherkin --Specification language that serves as input to Cucumber--, captures the scenario described in the previous section and illustrated with wireframes.
The goal of Cucumber is to use as input a document written in a controlled language, allowing one to specify and document the user story with the same file. Before proceeding, let me describe the installation of Cucumber related tooling in our IDEs.
As for other test artifacts (e.g. fixture files in the previous lab session),
we are going to follow the convention of putting Gherkin files in the
source folder /src/test/resources. To keep things organized,
we are going to create a folder with the name features and we are going to add a subfolder for bounded context. Since the
the user story above comes from the sales context, we are going to
save the file within features/sales (itself inside
/src/test/resources as explained before).
Cucumber on IntelliJ IDEA
In you IDE, use the key shortcut Ctrl+Shift+A (or Cmd+Shift+A if you are using a Mac) and enter plugins to open the
dialog window that will allow you to install Cucumber plugin. The
dialog will offer you a search field where you should enter "cucumber",
select Cucumber for Java from the result list and click
Install Jetbrains plugin…. Follow
the remainder steps as the IDE indicates.
Setting up the cucumber runner
We first need to update the Project dependencies. Copy them from the
snippet below into the project’s pom.xml file.
The first dependency in the snippet above adds support for serialization/deserialization of Java 8 time objects for the web tier. This is the component that parses the messages exchanged between Web browser and Web server and convert to Java objects as required in the controller classes.
The following 3 dependencies are specific to Cucumber. They include the
Cucumber runtime for Java, the connector for Spring MVC runtime and
the adaptor that allows Cucumber to be integrated with as a JUnit runner.
As so, we will need to use a special class (the runner) which will
be used to launch our Cucumber acceptance test. The following snippet
corresponds to the JUnit runner that we are going to use for this session.
Create a Java class with the name SalesAcceptanceTestsRunner under the package com.example.sales. Just remember that
this class must be in the source folder src/test/java.
The first annotation in the snippet above declares the class to be the entry point for running a JUnit-based test. It also overrides default JUnit settings, letting Cucumber take control over the test execution. Note that from the IDE’s perspective, running this test will be done in the same way you run any other JUnit test.
The second annotation serves to fine tune Cucumber’s configuration.
In that context, we first configure the format of the Cucumber output.
"pretty" implies that Cucumber will dump the feedback to the console
in color (seems not to work in IntelliJ’s console, though). The
second option forces Cucumber to produce an HTML-based report that
will be saved within folder target.
In the snippet above, I am instructing cucumber to look for the Gherkin
file(s) within the folder features/sales. My proposal
is to try to collect all user stories in a well-known folder (features)
and, at the same time, to classify the user stories according to their
bounded context. In this case, the user story is specific to sales,
which is reflected in the name of the folder used in the configuration
(i.e. features/sales). The option glue in
the configuration above, specifies the packages where cucumber must
look for the Java classes implementing the steps. Note that the options
features and glue are optional, but I propose
you to use such information to have a better control on the scope of
the tests.
|
Note
|
I found that the default configuration of Cucumber dumps a lot of information to
the console. This slows down a little bit the test. In order to
change the configuration, you can copy the following file into
the source folder
src/main/resources:
|
There you are. We can now move on, and start writing the Cucumber steps.
Implementing the steps
If you run the SalesAcceptanceTestsRunner, you should get
a big snippet with the skeleton of the implementation of the Cucumber
steps. You can copy that snippet (the one provided by Cucumber) or
the snippet that I included below. In any case, you must put the code
into a file, say CreationOfPurchaseOrderSteps.java, that
must be placed in package com.example.sales. Do not forget
that this file must be saved in the source folder src/test/java.
The Cucumber steps can be implemented with several frameworks (e.g. WebDriver, HtmlUnit, Geb, etc.). In this practical, I will use HtmlUnit, as shown in the following snippet.
Let me explain little by little the implementation of some of the steps.
The following step populates the database with the information about the plant catalog (test fixture).
Note that table specified in the step is transparently converted into a list of `PlantInventoryEntry`s. This way, we can straightforwardly save it to the database.
Populating the database with the information of the inventory (i.e. plant
inventory items) is a bit more complex. The problem is that each plant
inventory item makes reference to a plant inventory entry. In the Gherkin
user story, we have specified such fact by including the entry’s
id (i.e. plantInfo with plant inventory item). Hence,
before saving a plant inventory item to the database, we need to fetch
the corresponding plant inventory entry. The idea is reflected in the
following snippet:
In the step below, the implementation simulates the customer interaction
with the application, by navigating to the URL http://localhost/dashboard/catalog/form.
Note that we do not have to specify the port, because the interaction
is mediated by Spring-test runtime.
In this step, Cucumber and the Spring test runtime will activate the components on our application that normally serve the web application. That means that our application must implement a web controller all the other related artifacts. I copy an excerpt of it that I will shortly explain.
As you can see, we are defining a web controller. In that context, we
are defining a function called getQueryForm, which will
be activated with an HTTP GET on path /dashboard/catalog/form (as mentioned before, in the cucumber step). Note that the whole class
will be rooted in the path /dashboard and the annotation
GetMapping specifies that the segment /catalog/form is to be appended to the class level path /dashboard.
The function receives a parameter
model of class Model (it is Spring runtime
that calls this function and provides the right value for this parameter).
This parameter allows us to send information to the template engine.
In this case, we are creating a DTO that will hold the information
that we will later use to query the plant catalog, namely the substring
to be matched on the plant’s name and the rental period. The
class for such DTO is sketched below (yes, it is to you to add the
needed annotations).
Note that the class above refers to another DTO class (the one that wraps a business period). In this case, I will share with you the code corresponding to such a class. Hence, you can just copy the following snippet (the right package is to be decided by you):
The reason I decided to share the code with you is that, in this case,
the date/time variables require the annotation @DateTimeFormat.
Unfortunately, the component that handles the translation of the HTTP
request body into the object values passes to the web controllers as
parameters (i.e. the ObjectMapper) does not properly handle
date/time values by default. There are ways to cope with this problem,
the simplest of which is to add this annotation. In future sessions,
I will also discuss how we can explicitly configure the aforementioned
component.
In the next step, we simulate filling in the form by the customer. The
code is divided into three parts. In the first part, we query the HTML
document to find an element with the identifier name (check
the HTML template, you will see that there is an input element with
the identifier name). In the second part, we simulate
that the user assigns one string. The string is extracted from the
user story.
In the last part, we simulate that the customer clicks the submit button.
**Note that the variable customerPage is updated, because
the web page will be also updated after clicking the submit button.
The rest of the steps are incomplete as shown below. You are responsible for complete them as an exercise.
However, you will see that I have provided you with XPath expressions
to select the elements that are required to check the test expectations.
Do not forget to remove the throw new PendingException(); line from the steps as you proceed.
Your Task: Completing and Extending the Web UI Adapter
You will find a pair of html files that you can use in your application
by selecting the following links:
query-form.html and
query-result.html (since the files are html, you would need to ask the browser to show
the source code and grab it from there). Copy the files into the folder
templates/dashboard/catalog and templates/dashboard/catalog in the source folder containing your project’s resources.
We are using Thymeleaf as the template engine for generating HTML in our project (click on the following link to go to Thymeleaf’s web site, where you will also find its corresponding documentation). Please take into account that Spring boot 1.5 uses Thymeleaf 2.1.5 when you are the selecting the documentation, since the syntax of Thymeleaf has changed in its newest (but still beta) version.
You are required to implement the full scenario including the plant reservation. We will assume that the full scenario is fully automated (the plant reservation is handled by the information system without the intervention of Rentit’s clerk). If the reservation succeeds, the purchase order must be updated with a reference to the reservation. The total cost of the purchase order is updated only if the reservation is successful. If no physical equipment for requested plant (entry) is available, we have to set the purchase order as rejected and notify the customer of this situation.
-
Reorganize your current project according to the
Module Pattern. I propose you to consider the namescommon(for shared value object classes),sales(for purchase orders),inventoryorreservations, andmaintenance -
Refactor all the Entity classes to use the UUID-based identifiers (note that will also require to update the repositories)
-
Apply the
Factory Method Patternto your domain model (follow the example given in the lecture for classPurchaseOrderor, if applicable, use Lombok’s@AllArgsConstructorannotation) -
Finish implementing the Web adapter, i.e. implement the method in the controller corresponding to the third template. We assume that customer interactions happen in a
dashboard. This assumption is explicit in the URLs used within the HTML documents.-
Complete the implementation of the Cucumber steps. Please try to follow the BDD cycle approach. To this end, you can comment/uncomment the implementation steps as required
-
Finish creating the DTOs that are required for the
Presentation Model. For conversion of DTOs from/to Domain objects use theAssembler Patternpresented in the lecture.
-