Git Version Control Basics
Git is a version control system that lets you track who made changes to what when and has options for easily updating a shared or public version of your code on github.com.
Version control helps to store different versions of documents, scripts or other files, and also maintain a record of the changes to these files efficiently. If you use Git with GitHub, this will also track changes and keep the records, if many people work on the same files.
- Nothing that is committed to version control is ever lost, unless you work really, really hard at it. Since all old versions of files are saved, it’s always possible to go back in time to see exactly who wrote what on a particular day, or what version of a program was used to generate a particular set of results.
- As we have this record of who made what changes when, we know who to ask if we have questions later on, and, if needed, revert to a previous version, much like the undo feature in an editor.
- When several people collaborate in the same project, it’s possible to accidentally overlook or overwrite someone’s changes. The version control system automatically notifies users whenever there’s a conflict between one person’s work and another’s.
Teams are not the only ones to benefit from version control: lone researchers can benefit immensely. Keeping a record of what was changed, when, and why is extremely useful for all researchers if they ever need to come back to the project later on (e.g., a year later, when memory has faded).
Version control is the lab notebook of the digital world: it’s what professionals use to keep track of what they’ve done and to collaborate with other people. Every large software development project relies on it, and most programmers use it for their small jobs as well. And it isn’t just for software: books, papers, small data sets, and anything that changes over time or needs to be shared can and should be stored in a version control system.
We’ll start by exploring how version control can be used to keep track of what one person did and when. Even if you aren’t collaborating with other people, automated version control is much better than this situation:

“Piled Higher and Deeper” by Jorge Cham, http://www.phdcomics.com
We’ve all been in this situation before: it seems ridiculous to have multiple nearly-identical versions of the same document. Some word processors let us deal with this a little better, such as Microsoft Word’s Track Changes, Google Docs’ version history, or LibreOffice’s Recording and Displaying Changes.
Version control systems start with a base version of the document and then record changes you make each step of the way. You can think of it as a recording of your progress: you can rewind to start at the base document and play back each change you made, eventually arriving at your more recent version.

Changes Are Saved Sequentially
Once you think of changes as separate from the document itself, you can then think about “playing back” different sets of changes on the base document, ultimately resulting in different versions of that document. For example, two users can make independent sets of changes on the same document.

Different Versions Can be Saved
Unless multiple users make changes to the same section of the document - a conflict - you can incorporate two sets of changes into the same base document.

Multiple Versions Can be Merged
A version control system is a tool that keeps track of these changes for us, effectively creating different versions of our files. It allows us to decide which changes will be made to the next version (each record of these changes is called a commit, and keeps useful metadata about them. The complete history of commits for a particular project and their metadata make up a repository. Repositories can be kept in sync across different computers, facilitating collaboration among different people.
Note
The Long History of Version Control Systems
Automated version control systems are nothing new. Tools like RCS, CVS, or Subversion have been around since the early 1980s and are used by many large companies. However, many of these are now considered legacy systems (i.e., outdated) due to various limitations in their capabilities. More modern systems, such as Git and Mercurial, are distributed, meaning that they do not need a centralized server to host the repository. These modern systems also include powerful merging tools that make it possible for multiple authors to work on the same files concurrently.
Note
Paper Writing
Imagine you drafted an excellent paragraph for a paper you are writing, but later ruin it. How would you retrieve the excellent version of your conclusion? Is it even possible?
Imagine you have 5 co-authors. How would you manage the changes and comments they make to your paper?
If you use LibreOffice Writer or Microsoft Word, what happens if you accept changes made using the
Track Changes option? Do you have a history of those changes?
Installing Git
Note
In the University computer lab you DO NOT have to install Git. If you are attending the course in the University computer lab, please jump to So what is a shell? This section only for general info if you want to install Git on your own computer, and for remote students.
Windows
Download the Git for Windows installer.
- Run the installer and follow the steps bellow:
- Click on “Next”.
- Click on “Next”.
- Keep “Use Git from the Windows Command Prompt” selected and click on “Next”.
If you forgot to do this the program will not work properly the way we want it to. So, if this happens rerun the installer and select the appropriate option.
- Click on “Next”.
- Keep “Checkout Windows-style, commit Unix-style line endings” selected and click on “Next”.
- Keep “Use Windows’ default console window” selected and click on “Next”.
- Click on “Install”.
- Click on “Finish”.
Bash should be installed on your computer as part of your Git for Windows install (described above).
Mac OS X
For OS X 10.9 and higher, install Git for Mac by downloading and running the most recent “mavericks” installer from this list. After installing Git, there will not be anything in your /Applications folder, as Git is a command line program. For older versions of OS X (10.5-10.8) use the most recent available installer labelled “snow-leopard” available here.
The default shell in all versions of Mac OS X is Bash, so no need to install anything. You access Bash from the Terminal (found in /Applications/Utilities). You may want to keep Terminal in your dock for quick access to Git functionality.
Linux
The default shell is usually Bash, but if your machine is set up differently you can run it by opening a terminal and typing bash. There is no need to install anything.
So what is a shell?
What does it mean to be ‘in the shell’?
“Shell” is just another word for “command line interface” or “CLI” (to be strict: a “shell” program implements the command line interface).
Windows (since vWindows 8) has two default command shells: The basic CMD Command line (which was around since Windows 95) and the newer, more powerful PowerShell.
Each shell is a software program that provides direct communication between you and the operating system or application, providing an environment to automate IT operations.
On Unix systems shells are also around for a long time, and where the first user interface how people could interactively enter commands into computers. The “Bash” is the “Bourne again shell”, it has this name for historic reasons, its predecessor was called “Bourne shell” and is often the default shell on Unix and Linux systems.
Git for Windows provides the Bash shell to a Windows environment to unify command line interaction with git commands.
More information on command line interfaces and shells can be found here:
https://en.wikipedia.org/wiki/Command-line_interface and https://en.wikipedia.org/wiki/Bash_(Unix_shell)
Tracking Changes
- How do I record changes in Git?
- How do I check the status of my version control repository?
- How do I record notes about what changes I made and why?
Let’s go through the modify-add-commit cycle for one or more files. We’ll see where information is stored at each stage of that cycle, and then distinguish between descriptive and non-descriptive commit messages.
At first we should tell Git who we are, so this identity is connected to the changes we are making.
With the Windows File Explorer go to the geopython folder we created for this course. Right-click in the folder, the context menu should open, and you should see the option Git Bash here
cd /c/Users/Alexander/geopython/
git config --global user.name "alex123 Dracula"
git config --global user.email "alex123@tran.sylvan.ia"
git init initializes a repository. We have already created our geopython directory in the last lessons.
git init
Git stores all of its repository data in the .git directory.
git status
In the directory create a file new file, called NOTES.md, edit with your text editor of choice, add a line of text, save and close.
Run in the Git Bash following command:
git status
It should now also list your NOTES.md file as a new file. Now we will add the file to our Git control:
git add NOTES.md
If you now run git status again, you will see that git has acknowledged that it will now consider our NOTES.md file for version control:
git status
However, this has only announced to Git that we want to consider NOTES.md for version control. We have to commit our changes to Git in order to fixate the current state of affairs. You should commit rather frequently and use precise commit messages if possible.
This way you’ll later have a more detailed step-wise history of your actions.
git commit -m "initial commit, Starting with notes"
If you now check again with git status you should see that there is no mention of the NOTES.md file anymore.
git status
Note
If you’re making frequent enough commits, then your chunks of work are hopefully pretty focused, which in turn enables you to be clear in commit messages. Nothing is more satisfying than trying to trace back an undesirable change and quickly finding it because of a properly annotated commit history. If the description of what you did goes like: “Implemented 3 new features, added dropout, built a cross validation component, and refactored the training logic”, then you’re not making frequent enough commits.
Task Git GUI
With the Windows File Explorer go to the geopython folder we created for this course. Right-click in the folder, the context menu should open, and you should see the option Git GUI here. Click Git GUI here, and the Git Gui program window should open.
Examine the options and information provided!
Online Git Servers
Version control really comes into its own when we begin to collaborate with other people. We already have most of the machinery we need to do this; the only thing missing is to copy changes from one repository to another.
Systems like Git allow us to move work between any two repositories. In practice, though, it’s easiest to use one copy as a central hub, and to keep it on the web rather than on someone’s laptop. Most programmers use hosting services like GitHub, BitBucket or GitLab to hold those master copies`.
The most popular Git server online for free and public use is GitHub (github.com).
Basic GitHub accounts are free. We encourage you to create a GitHub account if you don’t have one already, because it is one way for you to openly display your (reproducable) work and one of the most practical, widely used and supported, and open collaboration platforms.
For completeness’ sake we would also like to honourably mention GitLab at the University of Tartu, which also free for students and staff with University of Tartu login credentials (your UT account).
Note
For University of Tartu Gitlab login please select login / account option Shibboleth in order to use your UT account. You might have to set the password for the GitLab server, in order to use the https Git remote link for your local Git repository (e.g. use your UT password also for the HTTPS tunnel).
Let’s start by sharing the changes we’ve made to our current project with the world. Log in to GitHub, then click on the icon in the top right corner to create a new repository called geopython:
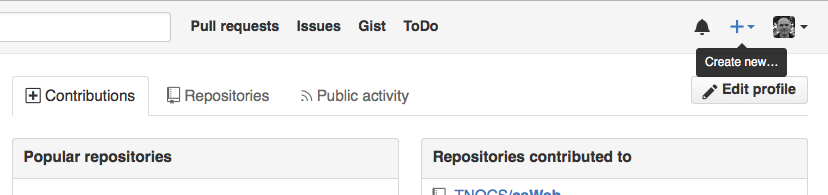
Creating a Repository on GitHub (Step 1)
Name your repository “geopython” and then click “Create Repository”:
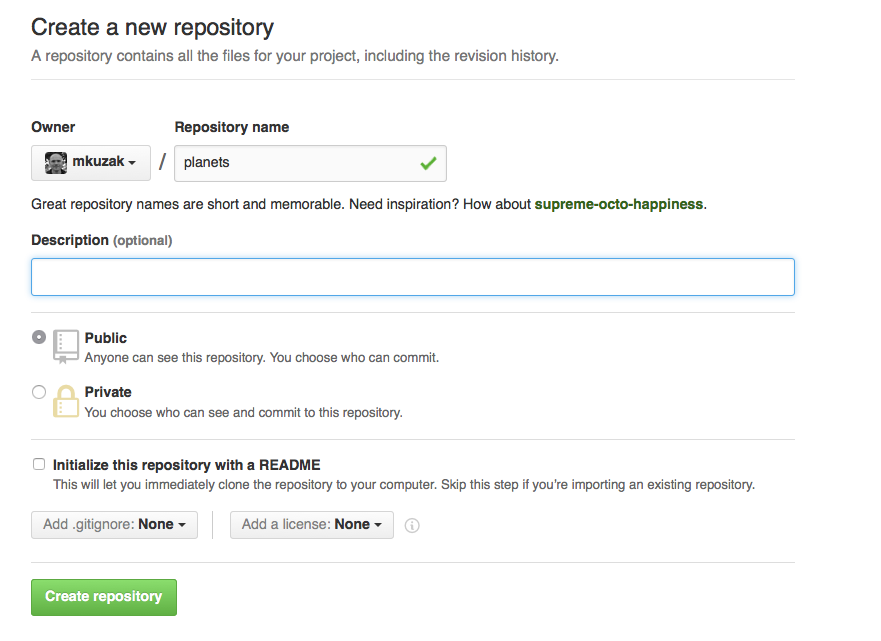
Creating a Repository on GitHub (Step 2)
As soon as the repository is created, GitHub displays a page with a URL and some information on how to configure your local repository:
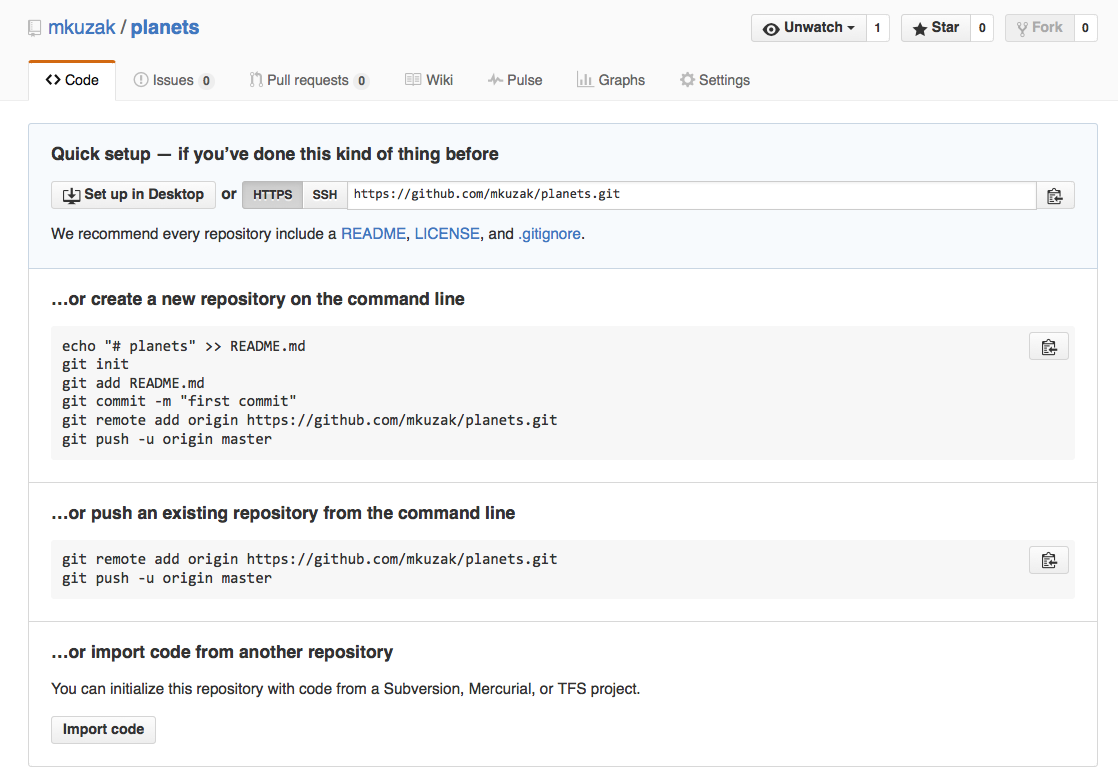
Creating a Repository on GitHub (Step 3)
This effectively does the following on GitHub’s servers:
mkdir geopython
cd geopython
git init
If you remember back to the earlier where we added and commited our earlier work on NOTES.md, we had a diagram of the local repository which looked like this:

The Local Repository with Git Staging Area
Now that we have two repositories, we need a diagram like this:

Freshly-Made GitHub Repository
Note that our local repository still contains our earlier work on NOTES.md, but the remote repository on GitHub appears empty as it doesn’t contain any files yet.
The next step is to connect the two repositories. We do this by making the GitHub repository a remote for the local repository. The home page of the repository on GitHub includes the string we need to identify it:

Where to Find Repository URL on GitHub
Click on the ‘HTTPS’ link to change the protocol from SSH to HTTPS.
HTTPS vs. SSH
We use HTTPS here because it does not require additional configuration. If you want to try setting up SSH access by yourself later, which is a bit more secure, by following one of the great tutorials from GitHub, Atlassian/BitBucket and GitLab video (this one has a screencast).

Changing the Repository URL on GitHub
Copy that URL from the browser, go into the local geopython repository, and run this command:
git remote add origin https://github.com/alex123/geopython.git
Make sure to use the URL for your repository rather than alex123’s: the only difference should be your username instead of alex123.
We can check that the command has worked by running git remote -v:
git remote -v

# should show similar output
origin   https://github.com/alex123/geopython.git (push)
origin   https://github.com/alex123/geopython.git (fetch)
The name origin is a local nickname for your remote repository. We could use something else if we wanted to, but origin is by far the most common choice.
Once the nickname origin is set up, this command will push the changes from our local repository to the repository on GitHub:
git push origin master

# should show similar output

Counting objects: 9, done.
Delta compression using up to 4 threads.
Compressing objects: 100% (6/6), done.
Writing objects: 100% (9/9), 821 bytes, done.
Total 9 (delta 2), reused 0 (delta 0)
To https://github.com/alex123/geopython
 * [new branch]      master -master
Branch master set up to track remote branch master from origin.
Proxy
If the network you are connected to uses a proxy, there is a chance that your last command failed with “Could not resolve hostname” as the error message. To solve this issue, you need to tell Git about the proxy:
git config --global http.proxy http://user:password@proxy.url
git config --global https.proxy http://user:password@proxy.url
When you connect to another network that doesn’t use a proxy, you will need to tell Git to disable the proxy using:
git config --global --unset http.proxy
git config --global --unset https.proxy
Our local and remote repositories are now in this state:

GitHub Repository After First Push
The ‘-u’ Flag
You may see a -u option used with git push in some documentation. This
option is synonymous with the --set-upstream-to option for the git branch
command, and is used to associate the current branch with a remote branch so
that the git pull command can be used without any arguments. To do this,
simply use git push -u origin master once the remote has been set up.
We can pull changes from the remote repository to the local one as well:
git pull origin master

# should show output
From https://github.com/alex123/geopython
* branch            master     -FETCH_HEAD
Already up-to-date.
Pulling has no effect in this case because the two repositories are already synchronized. If someone else had pushed some changes to the repository on GitHub, though, this command would download them to our local repository.
Push vs. Commit
We have just introduced the “git push” command. How is “git push” different from “git commit”?
When we push changes, we’re interacting with a remote repository to update it with the changes we’ve made locally (often this corresponds to sharing the changes we’ve made with others). Commit only updates your local repository.
Unrelated histories conflict?
In this section we learned about creating a remote repository on GitHub, but when you initialized your GitHub repo, you didn’t add a README.md or a license file. If you had, what do you think would have happened when you tried to link your local and remote repositories?
In this case, we’d see a merge conflict due to unrelated histories. When Github creates a README.md file, it performs a commit in the remote repository. When you try to pull the remote repository to your local repository, Git detects that they have histories that do not share a common origin and refuses to merge.
git pull origin master

# should show similar output

From https://github.com/alex123/geopython
 * branch            master     -FETCH_HEAD
 * [new branch]      master     -origin/master
fatal: refusing to merge unrelated histories
You can force git to merge the two repositories with the option --allow-unrelated-histories. Be careful when you use this option and carefully examine the contents of local and remote repositories before merging.
git pull --allow-unrelated-histories origin master

# should show similar output

From https://github.com/alex123/geopython
 * branch            master     -FETCH_HEAD
Merge made by the 'recursive' strategy.
 README.md | 1 +
 1 file changed, 1 insertion(+)
 create mode 100644 README.md
Ignoring things
What if we have files that we do not want Git to track for us, like backup files created by our editor or intermediate files created during data analysis?
Let’s create a dummy file in our geopython directory, call it temp.out, edit with a text editor, add a line of text, save and close:
Run in the Git Bash following command:
git status
It should now also list your temp.out file as a new file. But we don’t want to add the file to our Git control!
Putting these files under version control would be a waste of disk space.
What’s worse,
having them all listed could distract us from changes that actually matter,
so let’s tell Git to ignore them.
We do this by creating a file in the root directory of our project (in our geopython directory) called .gitignore.
Open the .gitignore file with a text editor and add temp.out directly as the first line, save and close.
These patterns tell Git to ignore any file whose name is temp.out.
(If any of these files were already being tracked,
Git would continue to track them.)
Once we have created this file,
the output of git status is much cleaner:
git status

# should now list .gitignore as a new file, but not show temp.out
On branch master
Untracked files:
  (use "git add <file>..." to include in what will be committed)

    .gitignore
nothing added to commit but untracked files present (use "git add" to track)
You might think we might not want or need to track it, but everyone we’re sharing our repository with will probably want to ignore the same things that we’re ignoring. Also, when you work with your repository on a different computer, you don’t want to create this file by hand again!
Let’s add and commit .gitignore:
git add .gitignore
git commit -m "Ignore data files and the results folder."
git status
You can also add complete folders or Wildcard patterns for files, with entries like so in your .gitignore file:
# this is a valid comment in a .gitignore file

# this is our temp.out ignore
temp.out

# this is ignoring the "generated" folder under/inside the "L1" folder
L1/generated/

# this is ignoring all *.tmp files
*.tmp
Task
Sort your geopython folder files and data into lectures sub folders (L0, L1, L2 ..) if you haven’t done already.
Then add your files to git. You can git add L1 to add the whole “L1” directory. No need to add all single files always.
Then git push orign master to push your important version-controlled changes from your local repository to the online Git server repository.
Check in the browser if all files arrived as expected. You can from now on “save” your work progress in GitHub and continue from another computer if necessary/desired.
Credits
The Git lessons are based on materials from The Carpentries - Software Carpentry Foundation:
http://swcarpentry.github.io/git-novice/
Copyright © 2018–2018 The Carpentries
Copyright © 2016–2018 Software Carpentry Foundation
All Software Carpentry and Data Carpentry instructional material is made available under the Creative Commons Attribution license. The following is a human-readable summary of (and not a substitute for) the full legal text of the CC BY 4.0 license.